Wednesday, September 23, 2009

Texture Nodes

Here's a tutorial on texture nodes that I found scouring the web.

Introduction to Texture Nodes

Posted on 13. May, 2009 by Andrew Price in Tutorials

If you're new here, you may want to subscribe to my RSS feed. Thanks for visiting!

In this tutorial we will be creating a brick texture using nothing but procedural textures and Blender’s powerful new texture node system.

teary-nights

Let’s begin…

Start by adding a plane and rotating it to face the camera.

1-plane1

With the plane selected, add a new material and new texture. Those familar with blender will recognize that a new button labelled Nodes has been added. Click it. You will notice that doing so, disables the standard dropdown texture choices.

2-nodes-button

Now switch to the Node editor.

15-node-editor

Again, you will notice a new button has been added to the header, in the shape of a spotted square. Click it to switch to the Texturing Node system.

1-tex-button

By default you will see a checkboard and output nodes. Go ahead and delete the checkerboard node.

3-delete-checkboard

Friday, August 28, 2009

packpanda

After numerous attempts on my PC, packpanda finally worked on Sunny's laptop. Thus proving even the computers at IIT are smart :)

Here's more information about packpanda

Chirag's drag and drop module (.py file) was used for the experiment and we successfully built a self-extracting installer, making the module an executable (.exe).

Monday, August 24, 2009

Drag Drop Module Up and Running

Start with a liitle experimentation with the Chessboard tutorial for Panda. Add to that substantial help from the Panda community. And voila! You get a working Drag Drop Module.

Here's a few screenshots:

This is the initial screen. The script provides the user with the capability to select and move the squares across the screen.

The screenshot has somehow not captured the mouse position. The light purple square being dragged. The next image displays the subsequent selection and dragging of the green square.

The code is available at my uhuroo site. Running the code in the Python shell returns the following error:

Traceback (most recent call last):
File "", line 3, in
import direct.directbase.DirectStart
ImportError: No module named direct.directbase.DirectStart

Here's the solution to that little problem:

1. Place the code in a particular directory.
2. In command prompt (for the Windows Platform), enter the following command:
ppython filename.py

ppython invokes Panda's python interpreter. It works better since it knows where exactly to look for the libraries.

I am tinkering the code to now achieve the same effect with the .egg meshes exported to Panda. Will post the results soon.

Friday, August 14, 2009

Chicken Exporter

One of the only positives that has come out of the swine flu pandemic is a 3 day break that has allowed me to get cracking on the project after a week long hiatus.

With Shobit working on converting .py files into installer setups, I began working on creating the py app itself. The first task being exporting the Blender molecule meshes to Panda. This is achieved using the Chicken Exporter, a python script that converts the .blend files to .egg files forming a common ground between Blender and Panda.

Here's the download link : http://sourceforge.net/projects/chicken-export/

While exporting UV wrapped meshes works perfectly fine, there have been a few problems with armatures, but for all practical purposes, our meshes can be painlessly transfered to Panda.

The first executable shall be posted shortly.

Thursday, July 16, 2009

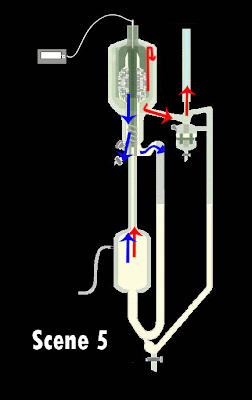
VLE process story board

Now that the apparatus and assembly part of VLE has concluced...we now move on to the challenging part ..the process.
the following is the story board for the animating the process.


regards
Gokul Menon

Friday, July 10, 2009

Blender Team ( advanced coursework preparation assignment)

The following are the topics to be covered :

Each team member is supposed to respond to this post (via comments) and chooose which topic they will cover... Start working on the document/ppt/html ASAP. Topics will be chosen on 1st come 1st serve basis..so choose topics fast.

Topics :

1) Polygon, Subsurface, Sculpt mode, Symmetrical modelling.

2) Modifier stack , build modifier , array modifier , mirror modifier etc (whichever you learnt)

3) Materials & textures (advanced topics in these like texture painting..specular textures..uv mapping ...etc)


4) Diffuse shaders, Specular shaders, Ambient light effect, Colour ramps,


5) Raytraced refectionsand transparency, Subsurface scattering and Halos.

6)Light types,difference between Computer graphics and real world, Rendering engines, Array lighting,Global illumination, Ambient occlusion and shadows .

There will be a meeting everyday from monday (13th july till 16th july ) from 4pm to 5pm to discuss and review the material made by the members. The coursework to be prepared as per the instructions given by sameer sir. (one can make html documents/word documents/powerpoint presentations.) It should include snapshots of tutorials , blend files (separate obviously) and detailed text matter on the subject covered.