Wednesday, July 18, 2012

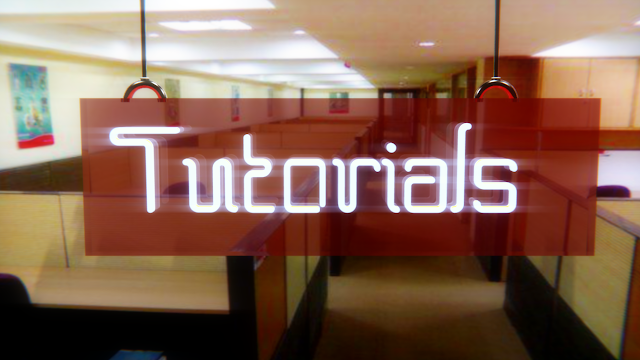
Neon Material for Blender Poster

Referred the following tutorial from Blender Guru for creating a glowing Neon sign:

http://www.blenderguru.com/create-a-glowing-neon-sign 

Manipulated the Scene a bit, added a plane behind the text and applied an image texture to it using UV mapping. In between this background and the neon material text, added a red colored Glass plate with metallic hangers.


Meter scale

In meter scale i have applied two texture. One is a wood texture & other is scale texture done in Photoshop.


Unwrap the scale. Then in cycle's material put image texture of wood.
Add another material, add image texture of scale.


3D Models for Physics Repository

Hey,

Some more models, with varied materials and textures, for the Physics Repository...

These are from the OSCAR website for Physics 3D model Repository , which were rendered initially. These models comprise of metallic, plastic and ceramic textures.

Following is a brief description about the models:

Crocodile clip: It is a simple mechanical device for creating a temporary electrical connector, and is named for its resemblance to an alligator's or crocodile's jaws. Functioning much like a spring-loaded clothespin, the clip's tapered, serrated jaws are forced together by a spring to grip an object. When manufactured for electronics testing and evaluation, one jaw of the clip is typically permanently crimped or soldered to a wire, or is bent to form the inner tubular contact of a ~4 mm female banana jack, enabling quick non-permanent connection between a circuit under test and laboratory equipment or to another electrical circuit. The clip is typically covered by a plastic shroud or "boot" to prevent accidental short-circuits.

Resistor: It is a passive two-terminal electrical component that implements electrical resistance as a circuit element. The current through a resistor is in direct proportion to the voltage across the resistor's terminals.

Hanger: It is a device by which or to which for Slotted Weights are hung.

Here are the initial renders in Blender 2.49:

Connecting Wire with Crocodile clips, Carbon Resistor and Hanger


Following are the current renders of the same, above mentioned models in Blender 2.63:

Carbon Resistor, Hanger and Connecting Wire with Crocodile clips

Hanger is rendered in Internal Blender Render Engine, after manipulating the diffuse and specular values of the material and adding Clouds and Stucci textures, for the bump effect.

Connecting Wires have plastic texture for the wires whereas metallic texture for the Crocodile clips and are also rendered in the Blender Internal Renderer.

Carbon Resistors are rendered with Cycles, which have metallic wires(comprises of Glossy material with a greyish color) with ceramic material(Diffuse BSDF) in the center portion of the model.


Alpha mapping in Cycles

Hello,

Alpha mapping ??

This was actually quite easy when it is done in Blender Internal Render.
Scale marking and transparent texture were easy to done in Internal render but little bit tricky when it comes to the cycles.
And for this little bit knowledge in Nodes is required.

In internal render when I do UV texture I create an another material identical to the original material and do the UV texture with the second material.
Otherwise texture will come on entire object.

While doing UV texture in cycles  I followed the same procedure and I used mix shader to combine both the material shader.
But  when I was doing transparent texture like of ruler texture or marking on screw gauge that time the method didn't work. Either the UV texture was blank or it showed mixture of both the material.

I tried many different ways to get it right like adding invert node or black white but it didn't work.

In internal render this problem is solved by using alpha or controlling the alpha value of the image texture.

In cycles if we want to do the same than alpha value of the image has to be given to the factor of mix shader in node setup.

This is the node setup for the texture I had done for screw gauge object.
In mix shader, one shader is image texture and the other shader is diffuse shader, and the alpha of the image texture is connected factor in mix shader.

 Screw gauge render files, other material and lighting done by Pooja Bhawar.


Models in Cycles

Hello, 
These 3D models had been made in Blender 2.49 version for Project OSCAR 3D model Repository and were rendered in Blender Internal Render engine.
I have re-done the material and lighting of these models in Blender 2.63 version and rendered with Cycles render engine.


Crucible: 

 Render output with the basic studio setup:


Crucible Material Setting:
For Crucible Material I have used Mix Shader one is Translucent BSDF and the second is the Diffuse BSDF. I have used Factor 1 and used the following color setting:- R:1.000, G: 0.950, B:0.900
 

 Ammeter: 

Black Plastic Material Setting
Metal Material Setting
For this Red Terminal I have used Diffuse BSDF shader and color values are:
R: 0.06372 , G: 0.001699, B: 0.001699.
For the Number texture I have used the Diffuse BSDF shader and in color i have used Image texture,  in Vector used Texture Coordinate / UV. 
For texturing I did the UV mapping first and then i made the scale texture in Photoshop and import it in blender using Image texture.

Brass-nails:


Originally done Blender 2.49 version
Brass Material Setting
First Render in Cycles with 300 samples
 
Final Render
Final Render with 300 Samples in Cycles


 Bar-magnet:

Previous Render in Blender 2.49
First Render in Cycles
Material Setting

I did the UV mapping in three parts using vertex group, then I have made the Image texture in Photoshop. I have used the following material settings:
I have used three Material for each vertex group part and import the texture using Image Texture on Color.

Front view
Top View
Final render

Battery:

Previous Render in Blender 2.49
Screw Deatails in Battery
Final Render In Cycles
Side View
Front View


Knitting Needles:


Previous Render in Blender 2.49


Brass Material Settings :


Head Details in Needle
Final Render

Tap key

                                              TAP KEY


 Hello ! This is a brand new tap key. :) Its base texture looked bad when i had just put black color & Diffuse BSDF . When rendered it came out to be a complete black object & edges were not seen. Nitin Ayer suggested me to put mix shaders. And yeah ! you can see its edges are clearly visible now.  Values of material are given below :


Brass material values are given below:


Separating Funnel.

In separating funnel i have used the same setting as the Flask cap. Only the world settings have been changed so that the glass texture is properly visible. I  have posted the final images with the settings below.


Detailed and close up view of the nob.


Color settings for the nob.


These are the settings for the glass material.


Detailing on the upper half of the Separating funnel.


The full view of the Separating funnel.